Written By Laura Barrera and first published on Agfuse
With harvest either underway or on the horizon for most growers in the U.S., now is a good time to prepare for your soil sampling program. Most universities and the NRCS recommend taking soil samples in the off-season, after the last crop harvest, and before the next cash crop is planted. Mississippi State University Extension advises collecting samples 3-6 months before planting, to allow any lime recommendations to react and change the pH. But before you can grab your soil probe and head out to the field, you need to understand best soil sampling practices and have a plan of action for collecting your samples, so you can accurately capture the soil chemistry and variability of your fields. Poor soil sampling practices can result in incorrect data, which can end up costing you in either inputs or yield.
“The foundation of understanding or making an appropriate recommendation comes from having a representative soil sample,” says Jason Ackerson, a Purdue University soil scientist. “That comes down to having a sample that’s demonstrative of the types of soil you see in that field.”
In short: The better your soil sampling program is, the more likely you are to see a return on investment from your soil and crop inputs while also producing healthier, higher-yielding crops.
Choose Your Lab
In his Soil Sampling Guidelines paper, Ackerson advises farmers to use the same lab for analysis every time they take soil samples because labs can use different methods, which may lead to different results. Using the same lab every time will ensure any changes you see are because of changes in the soil, rather than the testing.
If you’re new to soil sampling, it can help to pick out a lab before you start collecting samples, primarily for budgeting purposes. While Ackerson would never advise picking a lab solely on cost, knowing the price upfront can be helpful when considering the number of samples you plan to take and how you’re going to collect them.
“If a farmer comes to me and has a limited budget for soil sampling, it’s probably not feasible for us to recommend a high-resolution grid sample when they don’t have the resources to pay for that analysis,” he says.
In addition to price, consider whether you want just the soil test results or if you’d like additional information, such as fertilizer recommendations, as not labs will provide this. You’ll also want to make sure the lab is accredited, which should be available on the lab’s website. While most states have an accreditation system, there’s also a national accrediting laboratory body.
Finally, consider whether the lab’s testing methods are relevant to your soil’s environment. There are a couple of different ways labs can do extractions for nutrient testing, Ackerson says, and there’s usually one method they’re more comfortable with. You want to make sure those methods apply to your soil environment. For example, there are different methods for extracting phosphorus: the Bray-1 method and the Olsen method. The Olsen method is optimized for soils in more arid environments with high levels of carbonates, so it wouldn’t be ideal for a farmer in a region like Indiana to send his samples to a lab that uses it.
Determine Where You’re Going to Collect Samples
Whole-Field vs. Spatially Explicit Sampling
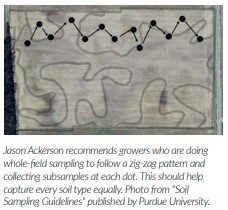
There are two primary strategies for choosing your sampling locations: whole field and spatially explicit. With the whole-field approach, you’ll collect several samples across the field, known as subsamples, which will then be mixed to create one composite sample. As Ackerson explains in “Soil Sampling Guidelines,” composite samples reduce the effects of soil variability and are less sensitive to unusually high or low soil test values that might occur due to concentrated fertilizer applications or natural soil variation.

Jason Ackerson recommends growers who are doing whole-field sampling to follow a zig-zag pattern and collecting subsamples at each dot. This should help capture every soil type equally. Photo from “Soil Sampling Guidelines” published by Purdue University. Whole-field sampling is most appropriate for farmers who only plan to make blanket applications in their fields. While long-term uniform applications can lead to inconsistencies, Ackerson says growers can find other ways of identifying those areas without moving to spatially explicit sampling. In some cases, they may take soil samples from specific problem areas to confirm any soil issues.
“Often a good crop scouter or agronomist can identify nutrient deficiencies based on scouting crops in the field,” Ackerson says, “but it’s good to have a soil sample there to doublecheck those symptoms are truly the result of a nutrient deficiency.”
Grids vs. Zones
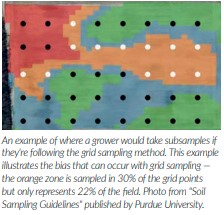
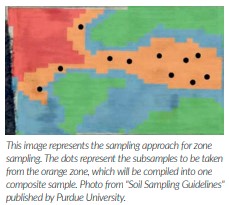
If you want to make any precision applications, you’ll need to choose between grid and zone sampling. With grid sampling, you’ll lay a “grid” over the field and pull soil samples from the points in that grid, while zone sampling decides where samples should be taken based on a field’s uniform areas. So if a field has places that are heavier in clay or higher fertility, those could be separate zones.

An example of where a grower would take subsamples if they’re following the grid sampling method. This example illustrates the bias that can occur with grid sampling — the orange zone is sampled in 30% of the grid points but only represents 22% of the field. Photo from “Soil Sampling Guidelines” published by Purdue University. In this example, the orange zone is sampled in 30% of the grid points (white points) but the orange zone only represents 22% of the total field. In this case, the resulting soil sample is highly biased to the soil conditions represented by the orange zone.
Zone sampling is the preferred option because grid sampling can be inefficient. Ackerson says this is due to the typical grid size of 2.5 acres, which means subsamples are often spread too far apart to capture enough field variation.
“There can often be a lot of point-topoint variabilities that can be missed in that course of a grid sample,” he explains. “To get really good spatially informed data from a grid sample, you need to sample more than most people would think about when it comes to grid resolution.”

This image represents the sampling approach for zone sampling. The dots represent the subsamples to be taken from the orange zone, which will be compiled into one composite sample. Photo from “Soil Sampling Guidelines” published by Purdue University. Grid sampling can also be unintentionally biased, he adds, because there may be areas that might require a different zone that could be missed in grid sampling. For example, you may create a zone in your end rows because they tend to have a higher accumulation of chemicals caused by reloading inputs on vehicles. But the sampling points in a grid may miss those differences.
Keep Your Data Consistent
While zone sampling is the better strategy if you’re making precision applications, Ackerson doesn’t recommend changing your practice if it’s going to conflict with the data you already have.
“Someone who has been doing grid sampling may have been an early adopter of precision ag and may have 15 or 20 years of grid sampling data on their farm,” he says. “That historical record is incredibly useful when mapping the trajectory of those fields and understanding whether you see improvements in soil fertility over time.”
That historical record is often more valuable than switching to any new best practice, he adds, especially if you’ve been following best practices with that strategy. The key to good historical data is staying consistent with your program, from the location strategy you’re using to the time of year you take the samples. The times to implement a new soil sampling strategy are when you’ve acquired new land or new equipment that can make precision applications, Ackerson says.
But What if You Haven’t Been Sampling Properly?
If you learn your soil sampling program hasn’t been following best practices, should you scrap the data you already have and move to something different? It depends. One of the most common mistakes Ackerson sees in soil sampling is underestimating how variable the soils can be, even in small spatial scales, which leads to not collecting enough subsamples for a composite.
“When we start thinking about it from a statistical perspective, the number of subsamples that you need to get an accurate representation is a lot more than I think most people realize at first blush,” he explains. “Because to us taking a soil sample — you could take eight composites one year in a square area, and they’re all going to look identical. But chemically they could be vastly different.”
If not taking enough subsamples is the mistake you’ve been making with your soil sampling program, but you’ve been collecting on a good distributed grid and have had success managing it, you’re probably better off sticking with that program to stay consistent with your data.
“If you’ve been doing grid sampling but only collecting only one soil sample at each point (i.e. not collecting composite samples), any individual point may be unreliable, but take on average, there is probably useful information on the whole field,” he says. “If you start increasing the number of composites, as long as you haven’t completely changed your sampling program, it’s not necessarily going to invalidate that historical data. The data will still be useful; it’s just a matter of how reliable it is.
Focus on Capturing pH
If you’ve been doing whole-field sampling and you’re not happy with the results or looking to improve your spatially explicit sampling program, consider precision sampling for pH. Ackerson has heard ag retailers say this is often the No. 1 thing growers can do to improve their soil sampling because it provides a great return-on-investment. The reason for this is two-fold:
1. Nutrient availability and plant health
Ackerson says these often come down to proper soil pH. If your pH is not correct, macro- and micronutrients’ availability can be out of balance. “Something like phosphorus might be in precision quantities for the crop, but if the pH is wrong, it would be unavailable to the crop,” he says. “Fixing a lot of fertility issues first starts with making sure the pH is correct.”
2. Soil tests related to pH are consistent
Ackerson explains that while nutrients like potassium can be variable year-to-year — even throughout the season — the liming recommendations of pH tests are more stable, so they provide reliable data. “The spatial data that comes from a precision-style soil sampling map related to pH is often really reliable because the underlying data are so good.
Best Practices for Pulling Samples
Once you’ve picked your lab and your soil sampling strategy, you’re ready to pull soil samples. Now you must decide who is going to collect them. While there is no downside to taking the soil samples yourself if you have the time, Ackerson says that hiring it out will be a lot more efficient.
“If I were running a farm, I would farm it out, even as someone with a Ph.D. in soil science,” he says. “The efficiencies of having somebody do it are tremendous.”.
If you decide to hire it out, look for a certified CCA you trust. If you choose to do it yourself, see Ackeron’s step-bystep instructions for pulling samples in the “Soil Sampling Guidelines,” and keep the following best practices in mind:
Pull Different Depths Under Conservation Tillage
Nutrients tend to stratify in no-till and reduced-tillage fields, which can lead to overapplication of inputs if we don’t sample at different depths, Ackerson explains. It’s not uncommon to see very low pHs in the soil’s surface layer because of continuous anhydrous ammonia applications that aren’t incorporated, while underneath the pH is fine.
If you have less than 50% of your crop residue incorporated, take samples up to 4 inches deep for pH and lime, then up to 8 inches for fertility.
Avoid Small Areas That Misrepresent the Soil
While you want to tease out the differences in soil between the zones or any areas you’re managing separately, you don’t want to pull samples from small spots that may be inconsistent with that zone or area. Ackerson explains that these tiny, localized spots — such as wet spots or highly eroded hillsides — may have different soil chemistries that can throw off the composite sample because they only represent a minimal area.
“Make sure the soil samples are representative of what we expect to see in the field,” Ackerson says.